![ビジネスマン](https://i0.wp.com/businessman.main.jp/wp-content/uploads/2023/04/cropped-image.png?resize=150%2C150)
ビジネスマン
見やすいブログを作成するために「アイキャッチ画像」は、必須のものと思います。今回は、アイキャッチ画像が簡単に作成できるソフト「Canva]の操作方法について記載します。以下はブログのアイキャッチ画像の作成を前提とした解説となります。
①:「Caanva」のHPTOPより右上の「デザインを作成」を選択
![](https://i0.wp.com/businessman.main.jp/wp-content/uploads/2023/02/スクリーンショット-2.png?resize=1024%2C576)
②:デザインを作成ボタンを押すとメニューが表示されるので「カスタムサイズ」を選択
![](https://i0.wp.com/businessman.main.jp/wp-content/uploads/2023/02/スクリーンショット-3.png?resize=1024%2C576)
③「カスタムサイズ」を選択し、サイズを入力します
→ブログのアイキャッチ画像は1600×900pxが良いようです。
![](https://i0.wp.com/businessman.main.jp/wp-content/uploads/2023/02/スクリーンショット-5.png?resize=1024%2C576)
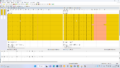
④画面左側テンプレートからお好みのテンプレートを選択
![](https://i0.wp.com/businessman.main.jp/wp-content/uploads/2023/02/スクリーンショット-7.png?resize=1024%2C576)
⑤お好みのテンプレートを選択したら、文字などを加工していきます。
![](https://i0.wp.com/businessman.main.jp/wp-content/uploads/2023/02/スクリーンショット-8.png?resize=1024%2C576)
⑥今回はテンプレートの文字を打ち換えました
![](https://i0.wp.com/businessman.main.jp/wp-content/uploads/2023/02/スクリーンショット-10.png?resize=1024%2C576)
⑦加工が終了したら画面左上のファイルよりダウンロードを選択
![](https://i0.wp.com/businessman.main.jp/wp-content/uploads/2023/02/スクリーンショット-10-1.png?resize=1024%2C576)
⑧画面右側にダウンロードメニューが表示されるので、クリック
→ブログの場合、ファイルの種類はPNGが良いようです。
![](https://i0.wp.com/businessman.main.jp/wp-content/uploads/2023/02/スクリーンショット-11.png?resize=1024%2C576)
⑨完成↓ ※本当に登録から完成まで5分くらいでできました。
![](https://i0.wp.com/businessman.main.jp/wp-content/uploads/2023/02/produced-by-buisinessman-1-1.png?resize=1024%2C576)
Just a moment...
コメント